There is another wonderful challenge over at Sparkle and Shine, and it is sponsored by Winnie & Walter. Our inspiration photo is a beautiful fall porch scene:
I've used the fall theme and colors to come up with this card:
I used Winnie & Walter's Into the Woods Creative Screenings with modeling paste colored with distress inks as my background. I added small leaves stamped with the new Brutus Monroe chalk inks on clear and orange vellum to keep with the fall theme. (They really do stay put when dry - no smearing) The stamp is from Unity Stamp's itty bitty Acorn Greetings rubber stamp set. I fussy cut the leaves and used the sentiment from the same stamp set, with gold embossing powder on vellum and backed with gold glitter paper. The tag is from Pretty Pink Posh, as are the scattering of sequins.
Monday, November 23, 2015
Sunday, November 15, 2015
CHNC Challenge 255: red and green
This week's CHNC challenge is to use red and green. I decided to add some brightness with pink and lime green for this card.
The image is one I purchased from Hazel during her online "yard sale" - I just love this image of a kitty taking a nap with Santa! The name of the clear stamp is "Special delivery", by Helz Cuppleditch. I've colored it with Zig clean color real brush markers and added clear wink of Stella to the fur trim sections. A white gel pen was used for the dots on the chair. Simon Says Stamp scalloped border die was also used with some gold glitter paper to add a more finished look. (The glitter paper is more like a varnished paper, so the glitter doesn't show up as much and it is very slick to the touch.)
Thanks for taking a look!
Wednesday, November 11, 2015
Sparkle & Shine Challenge Seventeen
Sparkle and Shine's Challenge seventeen is to use the following photo as inspiration:
The colors are so pretty together - reminds me of a summer garden.
So, in keeping with a flower theme, I used Altenew's Vintage Flowers stamp set with Color Box pigment inks. I added a die cut sentiment and some Pretty Pink Posh sequins to finish it off. Simon Says Stamp stitched rectangle die was used to cut the card top, which was popped up using foam tape. All in all, a pretty simple card but I love the color combo from the inspiration photo.
Friday, October 30, 2015
CHNC challenge 252: Nativity
This card is for CHNC's challenge 252, which is to make a card featuring some aspect of the Nativity. I used Ooh LaLa Creations Yuletide Wishes CD for the card top. I just love this CD! (it is one I won from an earlier CHNC challenge, too!)
I hope you enjoy this card and check out the other entries - they are beautiful!
Sunday, October 25, 2015
Sparkle and Shine Challenge Sixteen
The inspiration for this Sparkle and Shine challenge is the beautiful, sparkly pumpkin photo, below, and Winnie & Walter are the sponsors.
I made two tags for this challenge, one using black and purple and one using orange and purple.
Both tags started with the same background of purple cardstock clear embossed with Winnie & Walter's Pattern of the Rings stencil. I really like the shiny circles as a background. I used Mama Elephant's large tag die from the Tags a Lot set and the pumpkin from Unity Stamp's itty bitty Hello Pumpkin stamp set. Pumpkins were colored with Copics. Sequins and fence die were from Pretty Pink Posh, and acetate and ribbons were from my stash. The black cat and "spooky" sentiment, as well as "Happy Halloween" sentiment were also from my stash. To hold all layers together (background and acetate), I machine stitched around the edges.
Thanks for taking a look!
This close-up shows the clear wink of stella on the pumpkins. Just a subtle sparkle-I may have to add another coat!
Sunday, October 18, 2015
DeeDee's UmWowStudio September online workshop project
I recently purchased an online workshop from UmWowStudio, based on a recent class given by Dee Dee Catron. Since I live states away, I was happy to see she is offering these as online workshops.
I am not very good at building up backgrounds, and the videos are wonderful at explaining and showing how to do this. I chose the second tutorial for my card, since it showcased a Halloween project and I'm getting my cards ready to send out. The project DeeDee put together was a journal page, but I think it works well as a card top. I had so much fun making the background with different acrylic paints (watered down to make more of a wash) and even using them as ink for the scripty stamp. I also played with water misting for the spots but I improvised a little with the scene at the base of the card. Since I don't have many Halloween stamps, I used sections of the big tree to make it look like bushes.
I find DeeDee to be an excellent teacher and she includes her reasoning behind the steps. It's like taking a mini art class - love it (and this online workshop was only $10)!
Canon watercolor paper for base, gray bazzill for the hill
Acrylic paints in yellow, orange, mocha
Tim Holtz walnut distress ink for the edges
Unity Fright Night stamp for big tree and "bushes"
Unity Itty Bitty vintage handwritten stamp
Unity Itty Bitty haunted house halloween stamp for house, moon with bats, small tree
Inkadinkado all hallow's eve/halloween web stamp
UnWowStudio bat confetti inked with black versafine
Black card base
Light yellow cardstock for inside with Unity stamped sentiment from haunted house halloween set
Saturday, October 10, 2015
Sparkle and Shine Challenge Fifteen
This Sparkle and Shine Challenge is sponsored by Pretty Pink Posh. Our inspiration is the following:
I used both the circles and rainbow watercolor look of the inspiration photo and came up with this birthday card:
Tim Holtz water color paper was used with an UmWowStudio mask and Zig Clean Color Real Brush pens for the card front (popped up with foam tape). I used Simon Says Stamp's stitched rectangle die to cut it out. Winnie and Walter's "Let's Celebrate" (minus the "Let's") was heat embossed on vellum and attached lightly on the narrow edges. Just a sprinkling of assorted Pretty Pink Posh sequins finished it off.
Saturday, October 3, 2015
Go for the Gold, Day 2 inspiration
In honor of Sandy Allnock's Go for the Gold free online cardmaking class, I made a card with splatters of gold. I was inspired by Day 2. I used Heidi Swapp's color shine for the background splatters. I both sprayed the liquid on and also unscrewed the top and added larger gold dots using the applicator tube (tapping it off the end of the tube). The bird is from Tim Holtz's crazy bird set. I followed Sandy's suggestion from an earlier periscope viewing and added some eyelashes and turned up the mouth a little to make the bird look happier. I also added balloons from Winnie & Walter's Lets Party stamp set. The bird and balloons were colored using Zig Clean Clear Watercolor Markers. Though I'm not too sure about the purple and yellow combination for the bird (I still need to practice blending with the Zig markers, too) this is for a family member who likes bold, bright, and sometimes unusual color combinations. So, I think it will be OK as their birthday card.
I thoroughly enjoyed watching Sandy's videos and can't wait to try some other techniques she showed us.
Friday, September 25, 2015
Sparkle and Shine Green Challenge
The new Sparkle and Shine Challenge is to use the color green. It is sponsored by Winnie and Walter.
I've made two cards that will satisfy this challenge. The first was also to be entered into CHNC's Christmas challenge, but unfortunately our internet was down for awhile and I missed the deadline. (It was to use the letter "P", and my card has a pocket on the front.)
I used PPP's pocket border die, stitched duo 3, and sequins; Simon Says Stamp stitched rectangles; Heartfelt Creations stamp and die set colored with copics and stickles on the berries; old sentiment stamp (not sure where it is from) on the tag; patterned vellum; cardstock from stash.
I've included a few photos to show some of the details. The vellum's pattern reminded me of snow, so I added it for some extra interest.
The second card is a birthday card for my grandson. It is more of teal than green, but I didn't have green ombre inks and he likes blues more than greens.
I used Technique Tuesday's candle stamp to make the background and added a layer of vellum so the gold sentiment (Simon Says Stamp) would show up better. I also used Simon Says Stamp stitched rectangle dies and Pretty Pink Posh gold star sequins.
Here's the result:
Thursday, September 10, 2015
Sparkle and Shine challenge 13
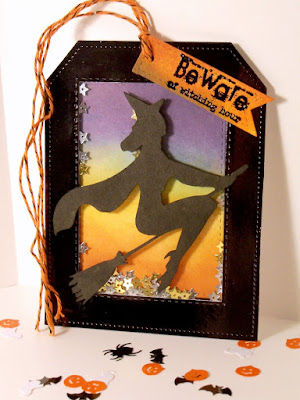
This tag is for the Sparkle and Shine challenge sponsored by Pretty Pink Posh. Since it is challenge #13 and Halloween is right around the corner, I decided to do a Halloween tag.
This is a shaker card using Mama Elephant's Tags A Lot die with Simon Says Stamp stitched rectangle cut out of the middle (I used black mirror cardstock) and a scrap piece of transparency for the window. The tag (stitched labels 1) and star sequins are from Pretty Pink Posh and the witch chipboard is from a prize pack I won years ago that I inked with black soot distress ink. The sky background was inked using several Tim Holtz distress ink colors, as was the tag. A little twine from the stash and a black heat embossed Unity Stamp Itty Bitty sentiment (Witching Hour) finished it off.
Monday, August 31, 2015
Papertrey Ink Stamp-a-faire Red Carpet Challenge
Well, the Stamp-a-faire has ended, and the following is a pic of the projects I was able to finish over the week-end. It was a fun event - I look forward to next year!
Papertrey Ink Stamp-a-faire threads and patterns challenge
This card satisfies both the threads and patterns challenge. I think I spent more time watching the online videos and looking at the design team projects than I did making my own projects. The threads video shows 10 different ways to use twine. I used one of the ways on my patterns challenge card. The pattern I used was #11.
Here's my take on it:
I used last year's PTI Stamp-a-faire background stamp from the 1960's set for the strip behind the buttons. The sentiment is from that same set.
Papertrey Ink's 2015 Stamp-a-faire, accessories challenge
The next challenge I decided to try was the accessory one. The tongue depressor bangles looked like a fun change from making cards. I wasn't so sure it would really work, but I am pleased with the results. It took a little preparation (boiling and soaking the sticks then finding something to use for forming the bangle) but was worth the effort. I ended up using a small tupperware container to shape the bangle. (I wish I had an oval shaped container). I followed the directions from the PTI video and everything worked as described. Here's the result:
I sanded the dry, formed bracelet, then heat embossed the stitched leaf border (stamp is from this year's PTI SAF kit) with Martha Stewart's copper embossing powder. I put a coat of Martha Stewart decoupage glue over the whole thing to seal the wood a little. After heating and brushing on the glue, I had to tie some twine around the bangle to re-shape it a little, as it straightened out a bit. (My daughter said I cooked it with the head gun when heat embossing - she's probably right)
PTI Stamp-a-faire Bridal Challenge
Saturday was the annual Papertrey Ink Stamp-a-faire, and this is the first card I made. It is for the bridal challenge. We were to make a card using only white, except that we could use a neutral color for the sentiment. The sentiment was heat embossed using last year's PTI SAF stamps, flower and leaf dies. This was a fast-paced day but so much fun!
White shimmer paper, plain and dotted vellum, Martha Stewart embossing powder, and Pretty Pink Posh sequins were used for this card.
Monday, August 24, 2015
Sparkle and Shine Challenge 12
This Sparkle and Shine challenge is sponsored by Winnie & Walter, and is based on the following photo:
I used the yellow, black, white, and red color theme to make a card that would be able to be used for a number of occasions. (Since my kids are all grown I don't have a need for a back to school to card.)
Here's what I came up with:
I used the Altenew vintage flowers die and stamp set with distress inks (barn door and fired brick), as well as Pretty Pink Posh's Stitched Borders 2 die for the edge of the yellow print paper, and Pretty Pink Posh's sparkling clear seed beads for the flower centers. Patterned paper was from Authentique's Essentials Collection - Blissful. The sentiment is one I had left over from a previous project. (It is one of Mama Elephant's dies - scripty hello.) Very simple, but I actually like the color combination.
Thanks for taking a look!
Sunday, August 9, 2015
Sparkle & Shine challenge
This card is for the Sparkle & Shine challenge, sponsored by Pretty Pink Posh. It is a photo challenge, with the following as inspiration:
I normally don't do many orange cards (except for Halloween), but this picture is so very pretty, I went with the orange floral theme!
I used Flourishes' Garden Picks stamp set for all of the stamped images, using their cut files to cut them out before stamping. They were colored with Copics. For a background, I used UmWowStudio's butterfly mask with Golden Artist Colors Light Molding Paste. All the edges of both the card top and sentiment strip were cut using Pretty Pink Posh's Stitched Borders 2. A few Pretty Pink Posh marshmallow sequins finished it off. The background cardstock was popped up, as was the sentiment strip.
I hope you enjoy looking at all the beautiful cards at the Sparkle and Shine Challenge blog!
When I was taking the pics, I noticed a slight smudge on the upper right section of the card, so I tried to remove it with an eraser. Well, I made it worse so had to do something to fix it. I ended up adding more butterflies. Here's the end result - I wish had I left well enough alone, but the finished card isn't too bad. (I did like it better before I "fixed" it, though)
Monday, July 27, 2015
flowers in glass jar (from Sandy Allnock's video)
This card is taken directly from Sandy Allnock's video tutorial. As you can see, I followed her directions and design very closely. I am still a novice at using Copics, so her video was a great help! I urge you to check out her blog. She has so many wonderful things there, including many instructional videos. I have linked the video I used here.
Here is the card I made using the video as a guide:
I used distress inks for the coloring behind the window and the strip along the bottom. The window was cut out using Pretty Pink Posh's Stitched Duo 3 die, the white strip was cut using Pretty Pink Posh's Stitched Borders 2 die, and the stamped flowers, jar, and sentiment are from Flourishes' Garden Picks clear stamp set. They were cut out using the coordinating Garden Picks die cuts file. Pretty Pink Posh sequins were added and the top was popped up with foam tape.
I still need to work on blending my flower colors - the small, detailed flowers were a little more than I had patience for, but I tried to use some contrast. Next time, I'll spend more time on the flowers to make them look more realistic. Since I need to mail this out soon, it will have to do.
Overall, I am quite happy with the results. Thanks so much for taking a look.
Friday, July 24, 2015
Sparkle and Shine Challenge #10
This Sparkle & Shine Challenge is sponsored by Winnie & Walter, and is based on the following sketch:
This is my version. I saw the background circle and thought of a large red and gold sun or moon and it reminded me of Halloween.
I blended several distress inks together using a circle die as my stencil. The spooky castle and 2 bats are chipboard pieces from UmWowStudio. They were painted black with gesso and the bats also have some stickles on them. The sentiment is from my stash and was placed on some white cardstock that was cut using Pretty Pink Posh's Stitched Borders 2 then popped up with foam tape. I also used Simon Says Stamp's stitched rectangles for the card top. Some sequins from Pretty Pink Posh finished it off.
Thanks so much for taking a look.
Sunday, July 5, 2015
Sparkle & Shine Challenge #8
Challenge #8 at Sparkle & Shine is a photo inspiration, here:
I went with the red, white, and blue, using a mason jar and stars to capture the celebratory feeling of this photo.
Here's my take on it:
I went with the red, white, and blue, using a mason jar and stars to capture the celebratory feeling of this photo.
Here's my take on it:
I used the mason jar stamp from Unity's Your Light Shines Itty Bity set, a Flourishes sentiment stamp, Martha Stewart silver embossing powder, Simon Says Stamp Stitched Rectangles dies (outer frame is popped up with foam tape), Pretty Pink Posh star sequins, and light grey and blue Zig Clear Clean Water Colors for a touch of color on the white water color card. The star paper and red card stock are from my stash. I painted the light blue stars in the border with Wink of Stella for a little shimmer.
I hope everyone is having a wonderful week-end. Thanks for taking a look!
Friday, July 3, 2015
CHNC challenge 235 - two words
For this week's CHNC challenge, I made 3 very quick and easy cards using some old supplies. I'm in the process of purging/cleaning, so I thought I'd try and use some of the very old stickers, rub-ons, card bases, etc.
Here's what I came up with. I'll probably go back and add some other elements to dress them up -
Thanks for taking a look, and be sure to check out the other beautiful cards on the CHNC blog.
Here's what I came up with. I'll probably go back and add some other elements to dress them up -
Thanks for taking a look, and be sure to check out the other beautiful cards on the CHNC blog.
Wednesday, June 24, 2015
Sparkle and Shine Challenge #7
The challenge at Sparkle and Shine for the first part of June is a sketch challenge sponsored by Winnie and Walter. Here's the sketch:
And here's my interpretation:
For this shaker card I used the following:
Winnie and Walter Birthday Bash sequins with some added Sunshine Glow sequins (made by PPP)
Winnie and Walter The Party stamp set for the sentiment
Lawn Fawn Let's Polka 6x6 paper pad
Pretty Pink Posh Stitched Duo 3
Unity Itty Bitty Gladness Touch Your Life flower stamp
Zig Clean Clear water colors
vellum, ribbon, and card base from my stash.
The flower was heat embossed with Martha Stewart silver embossing powder on vellum then colored on the back. To make the shaker, vellum was machine-stitched onto the Lawn Fawn paper (tiny white hearts on a sunshine yellow background)
Another fun challenge. Hope you stop by the Sparkle and Shine blog and look at everyone's beautiful entries!
Friday, June 12, 2015
Summer Coffee Lovers Blog Hop
This card I made in honor of the summer coffee lovers blog hop. There is a very long list of wonderful sponsors, and many beautiful cards for inspiration. Since my family loves tea and coffee, this is the perfect hop!
For my card I used a Flourishes clear stamp from the grab a cup set and the sentiment is from TPC Studio's coffee cafe clear stamp set. The card base was stamped with a coffee bean stamp and the card top was popped up using fun foam. Image was colored with Tim Holtz distress markers.
This was a quick, fun card to make - thanks for taking a look!
Sunday, June 7, 2015
Sparkle and Shine Challenge/PPP Watercolor Blog Hop
The first Sparkle and Shine challenge for June is up, and it is another beautiful photo inspiration. It is sponsored by Pretty Pink Posh (PPP):
There is also a watercolor blog hop going on this week-end, hosted by PPP:
Since my 35th wedding anniversary is next week, I decided to make a special treat bag for my hubby. In it, I'll put a note letting him know I have arranged a week-end get-away this summer for the two of us. It's only a short distance from where we live, but it will be so nice to relax and visit another area's gardens and farmers' market.
I used the ombre theme and kept things pretty monochromatic. There was a water color technique shown by Laura Bassen on her card for the PPP watercolor blog hop this week-end that I wanted to try, but I didn't have a grid stamp. So, I used an UmWow mask. I brushed rubber cement on the back to keep it secure and prevent bleeding underneath while I painted each square. (I made sure there wasn't any cement in the area I was painting - used my fingers to rub the residue off.)
I also was anxious to use my new Lawn Fawn Goodie Bag die, hence the bag instead of my usual card.
I'm still working on my picture-taking skills, but I am pleased with my project. I think hubby will like it, too!
Supplies:
Strathmore water color paper
UmWowStudio checkerboard mask
Zig Clean Color Real Brush water color marker - light blue
Vellum
Lawn Fawn die - Goodie Bag
Unity Stamp Co - Itty Bitty stamp - Gladness Touch your Life
Pretty Pink Posh Stitched Labels 1 die
Pretty Pink Posh sequins - sparkling clear
Martha Stewart sterling embossing powder (sentiment)
Siam Silver embossing powder for flowers (got this from DeeDee at UmWow years ago- not sure what company made it, but it has some glitter in it that doesn't show up that well in my photo)
3girljam ribbon - sterling
Thanks for taking a look!
I will also be linking this up at the PPP Watercolor Blog Hop and UmWowStudio's June "anything goes" challenge.
Sunday, May 24, 2015
Sparkle and Shine Challenge
This is a photo inspiration challenge from Sparkle and Shine, and is sponsored by Winnie and Walter.
I just love the round curves of the vase and all that silver confetti. The round shape is what I used as my inspiration. Winnie & Walter's clear stamp set, The Party, has many wonderful stamps with that same shape: balloons, Chinese lanterns, flowers. I used the Chinese lanterns.
I've been playing with the Zig Clean Color Real Brush markers I just bought, and used them to color the lanterns. They blended well using a small paintbrush dipped in water. I also added a clear Wink of Stella top coat which further blended the colors. The sparkle is subtle, but I think it adds just the right touch. I also die cut one edge of the water color paper (Tim Holtz Distress Watercolor CS) with PPP's curved die from Stitched Borders 1 (again, it reminded me of the curve of the vase in the picture). I stamped a sentiment from the same Winnie & Walter stamp set, and added some PPP 6 mm silver confetti. A side strip of bright pink shimmer paper (from my stash) was adhered to the card base (Neenah 110 lb solar white smooth CS) and the card top was popped up using foam tape.
I've been loving these challenges and enjoy looking at all the wonderful cards the design team and everyone else has made!
Friday, May 1, 2015
CHNC Challenge - 20 minutes or less
This week at CHNC, we are asked to make a Christmas card in 20 minutes or less. I immediately went to the Ooh LaLa Creations Yuletide Wishes CD and printed a topper and background paper. Just a little foam tape to add some dimension to the topper and scrap solid cardstock finished off this very quick card!
Friday, April 24, 2015
Sparkle and Shine Challenge 4 - sketch challenge
Here is the sketch for challenge four at Sparkle and Shine's Challenge blog:
I really like working from sketches, and this is a very nice one. Here is my interpretation:
I used a Flourishes stamp colored with copics, Authentique papers, Simon Says Stamp! Stitched Rectangles dies, Pretty Pink Posh Stitched Borders 1 (the zigzag border on the striped paper), and Pretty Pink Posh sequins. The stitched rectangle pieces are popped up using fun foam to give it some dimension. The sentiment was in my stash. I colored it with distress markers and painted it with glossy accents before adhering.
I had fun putting this card together - thanks for taking a look!
Thursday, April 16, 2015
CHNC Challenge 224 - add some texture
This week at CHNC, we are challenged to use some texture on our Christmas card. I recently received my prize from a few of weeks ago (CHNC challenge 220) and couldn't wait to start using it. I won an Ooh La La Creations CD ROM of my choice, which was Yuletide Wishes. There are so many wonderful things on this CD!! This is my first Ooh La La Creations item and I am loving it! Here's what I created:
The topper is from the CD, and is a stacked decoupage image. It was so easy to use, and I really like the way it looks. I'll be sending this through the mail, so I didn't use foam tape between each of the 6 layers but instead alternated layers. You can get an idea from the bottom picture. It still has quite a bit of dimension, which I like. For texture, I used an Anna Griffin embossing folder on gold shimmer paper and stickles on the large star dotting the "i" in Believe. Just a touch of organza ribbon finished off the 5 x 7 inch card.
Thank you for stopping by, and be sure to check out Crafty Hazelnuts Christmas Challenge (CHNC) and Ooh La La Creations.
Monday, April 6, 2015
Sparkle and Shine Challenge 3
Sparkle & Shine Challenge Three: Photo Inspiration Sponsored by Pretty Pink Posh
For this challenge from Sparkle & Shine, I was inspired by the tulips (my favorite flower) as well as the overall composition. When I saw the jelly beans in the jar, I just knew I had to do a shaker card using Pretty Pink Posh's sequins.
Items used: Authentique 6x6 collection: Lively
Technique Tuesday Greenhouse Society Stamp: Tulips
Tim Holtz: Distress Markers
Simon Says Stamp: Stitched Rectangles die, Frames die
Pretty Pink Posh: Stitched Duo 3, springtime mix (minus the aqua), moss green and sparkling clear sequins
Spellbinders for Flourishes: Classic Tags Template die
Flourishes: Tiny Flowers and Tags clear stamps
Jilli Bean Soup: Twine
Subscribe to:
Posts (Atom)